So without further ado, I bring you...
and...
For this tutorial I am not including the application of concealer and foundation. I realize not everyone understands how to achieve a "flawless" look with bases, but basic application of foundation (and concealers if needed) will allow anyone, no matter their proficiency level, to have a relatively even skin tone for their face. If enough people request it, I will do a concealer and foundation application post in the near future (but you have to request it for it to happen folks).
Step 1 : Start with clear or neutral primer for your eyeshadow. Primer prevents your look from running down your face. For this look, I used Too Faced Shadow Insurance. Apply the primer over your entire lid, from lashes up to your brow. I typically use my fingers for this on myself.
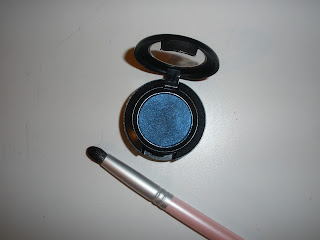
Step2 : Using a blackened shimmer navy blue (I used MAC's Deep Truth) and a pencil brush, gently pat the color along the crease of your lid. You are simply creating some shadow and outlining the cut crease for this look.
(Notice I am not worrying about a perfect line, and the color is soft, not saturated.)
Step 3 : Taking a matte black and the same pencil brush, gently pat along the crease so the shadow rests hald on our dark blue, and half above the blue. Begin to build the saturation, but don't sweep the brush, just pat it so as to prevent raccoon eyes and fall out. We are defining the cut crease now.
(Note that the black is blending into the dark shimmery blue and adding more depth to the crease.)
Step 4 : Taking a deep black with blue shimmer (I used NARS Night Flight for a reference) and the same pencil brush, apply this along the upper edge of the black by gently patting. This is adding in even more depth to the crease.
(Do you see the difference between the above Deep Truth, and this black based shadow w/blue shimmer?)
Step 5 : Taking a silver base (I opted for a cream silver with NYX's Jumbo Eyeshadow Pencil in Pots 'n Pans), apply this to the ball of your eyelid. Be sure not to place the silver beyond the line of the crease, do not blend this into the dark crease you just created.
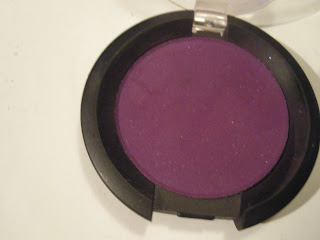
Step 6 : Taking a medium purple (I used Sugarpill's Poison Plum), and a small shader brush begin to apply above the darkened crease. Start on the outer corner of your eye (this will be the widest part of the purple), and move across, blending just slightly into the upper edge of your crease, keeping mind to gradually decrease the width of the purple as you move towards the inner corner, eventually tapering down towards your inner corner. Be sure to blend up lightly so the purple fades into nothing the closer you move towards the brow bone. If you are unfamiliar or haven't practiced blending much, use a light hand here, and add saturation as you go. It's much easier to add, than to remove at this point in the process. :)
Step 7 : Taking a shimmery white with silver/pale blue undertones (some whites can appear more silver, some more yellow, just compare and find the one that looks more blue/silver compared to it's counterparts), and a large blending brush, sweep this along the upper edge (the palest part where you blended the purple up to) of the purple and up to the brow bone to highlight. Try not to go with something glittery, just a soft shimmer is sufficient (even a matte would be good!)
(I opted for Lime Crime's Top Hattie Magic Dust, but above is a great example of a pressed shadow with similar look and it's cheap in price, found at your local drugstore/Fred Meyers/etc., and made by Wet 'n Wild!)
Step 8 : Here comes the fun! Taking a soft silver glitter with a hint of rainbow shimmer (I am using NYX's Glitterati Pallet, the bottom two on the left!) you will apply this to the ball of your lid. Be sure to keep the glitter from the bottom edge of the crease and below. You want this to be a fun, flirty pop of sparkle, not a disco ball. This can be done several ways. Two of my favorite are as follows:
Method 1 : Use a cream based, eye safe glitter, and simply apply using your fingers by patting gently over the desired application area. (NYX and Wet 'n Wild both have some awesome cream glitter pallets!)
Method 2 : Use a loose glitter (for your own safety and to prevent injury to your eye please make sure any glitter you use in your eye area is in fact eye safe!) and a sealer/glitter glue/fixative safe for cosmetic/eye use. I tend to prefer LA Splashes glitter adhesive myself, but there are many out there. NYX, Lit, Glamourdoll Eyes, and several others make awesome glitters that are safe for use around the eyes.
(I applied the silver holographic glitter to the center of my eye, and used the darkened holographic glitter along the edge where the silver meets the dark crease.)
Step 9 : Using a black eyeliner, line your bottom water line (the liner should be place above your bottom lashes, not underneath). Take a silver liner (a white could work as well), and liner below your bottom lashes. Take the silver (or white) liner and line about 1/3 of an inch along the eyeshadow of your eye's outer corner. (You can see how I did this better with the Black and Silver look in the first picture I posted. Notice how the black liner from the bottom follows along the eyeshadow for a tiny bit?)
(I used Urban Decay 24/7 Liner in Perversion, and Milani Easy Liner Glitter in Silver)
Step 10 : At this point you can clean up any fall out with a makeup wipe or cotton ball with makeup remover. If there is any loose glitter on your face, use some tape to get it off. Go ahead and put on concealer, foundation, setting powder, etc. And then put on your choice of mascara. Be sure to curl those lashes so they stand out. If you wish to, you can also apply some elegant falsies too!
Step 11 : Apply your blush. I opted for a soft matte pink from my Coastal Scents 10 pan blush pallet. Try to keep it soft, not super dramatic.
Step 12: Apply a nude with some peachy or pink undertones, and a soft neutral pink gloss. I selected MAC's Blankety lipstick and MAC's Dazzleglass in Soft Dazzle (from 2010's Christmas Tartan Plaid collection).
You can go any direction you wish with the lipstick. I went with a fun magenta with the black and silver look. It's up to you how much color you want. The more color, the more dramatic your look!
A soft, yet dramatic eye with an elegant nude lip.
Or a vampy, flirty magenta with a fierce and bold eye!
So give it a shot. Don't be afraid to try out new colors you never thought you'd ever wear. Anyone can wear color, and anyone can wear bold eyes!
Have fun with makeup. It doesn't always have to be about the perfect liner, or the right shade of lipstick. It's about being creative, doing something for yourself, and exploring your artistic side (and yes, everyone has an artistic side).
Rachel's Pro-tip!
Ever wonder how makeup artists create that rigid, straight line for the eyeshadow on the outer corner of the eye?
Use tape! Apply tape at an angle, starting from the outside corner of the eye, and shift it up towards your hair. The angle can be as sharp as you want! Apply to both sides and double check to be sure they are as even as possible, then apply your look! When you're done, gently pull the tape away and VOILA! An edgy shadow look with minimal effort!


